UPHOLSTERY
The materials that I use are: A piece of softwood (jelutong) for the base; fairly thin brass pins; double sided sticky tape; PVA glue or impact adhesive; very thin soft leather; foam rubber; paint (to match the leather); dress making pins or similar.
Most of the upholstery that I make is for built in furniture so it is important to get the size right.
I start with the wooden base (jelutong) about 6mm thick cut to the exact size and shape for the seat and test to make sure that it fits perfectly. Then I work out the thickness of three layers of the leather and draw a line around the entire edge of the wooden base to represent this thickness (see photo). I then sand the base all round to the pencil mark. When the leather is in place it should make up for the wood that has been removed.
Apply a piece of double sided sticky tape to the top side of the wood and cut away the surplus. Remove the backing paper and apply a piece of foam rubber about 6mm thick to the sticky surface allowing a slight overhang all round. Place the padded seat foam side down onto a cutting board and press hard on the wooden base so that the foam is compressed evenly, then follow the wooden edge with a sharp scalpel to remove the surplus foam.
Cut a piece of leather to cover the seat allowing a generous overhang on all sides (you need enough to get a good grip on). Start in the middle of one of the long sides if there is one and pin it with a brass pin. Work towards the corners pinning at about 10mm intervals. Go to the other side and pull the leather tight over the foam- do not press on the foam, just pull on the leather and start pinning from the middle to the corners making sure that the leather is evenly stretched. Pull the ends and corners tightly down and pin right in the corner. Depending on the tightness of the corner and the thickness of the leather, it may need some of the leather removed. It may even require extra pins to negotiate some tight corners but they will all be covered by the edging.
When all sides have been pinned, the surplus leather can be trimmed level with the bottom edge of the wood.
For the edging I use a strip of leather about 25mm wide and long enough to go right the way around the seat in one piece. I use a dress making cutters wheel with a straight edge to cut the leather as I find that I get a cleaner cut than with a scalpel. I mark the reverse side of the leather down the middle of the entire length. I press hard using a blunt pencil to get an indentation in the leather. It is a good guide for folding the leather in half and helps to give a sharp folded edge. Spread glue over the entire length of the leather. I’ve tried PVA and impact adhesive and both work well. If you use PVA you will only need to spread the glue on one half of the leather. Start pinching the leather together from one end following the pencil line. Lay the finished strip on a clean firm surface and roll something like a jam jar along the length to get a good sharp folded edge.
Choose the least conspicuous point to have the join in the edging and decide what type of join you intend to have. I tend to chamfer the two ends and overlap them but if you are very precise you can butt join them. Using the chamfer method, pin the leather through one end placing it where you want the top edge to come. Hammer the pin right in as it will be covered when the join is completed at the end. You now have something to pull against to make sure that the edging is tight and even. I prefer to glue one side at a time to avoid getting my fingers in a mess and spreading it on the leather. Just a thin bead of glue is enough, don’t use too much as you run the risk of it getting squeezed onto the surface of the leather and it is very difficult to remove it.
Work your way around all sides and finish off by gluing the chamfered join.
Cut the surplus edging off flush with the wooden base.
The final job is to get the button effect. Work out where you want the buttons to be and mark the spots through the leather and foam right into the wood using a small sharp point (I use a compass point). Hammer some dress making pins through the marks until you have about 10mm showing on the underside but the heads are still well clear of the leather. Paint the heads with a paint to match the leather and put to one side to dry. Pull the pins through from the underside with a pair of pliers until you can pull them no further. Cut off the pins and file level with the wooden base.
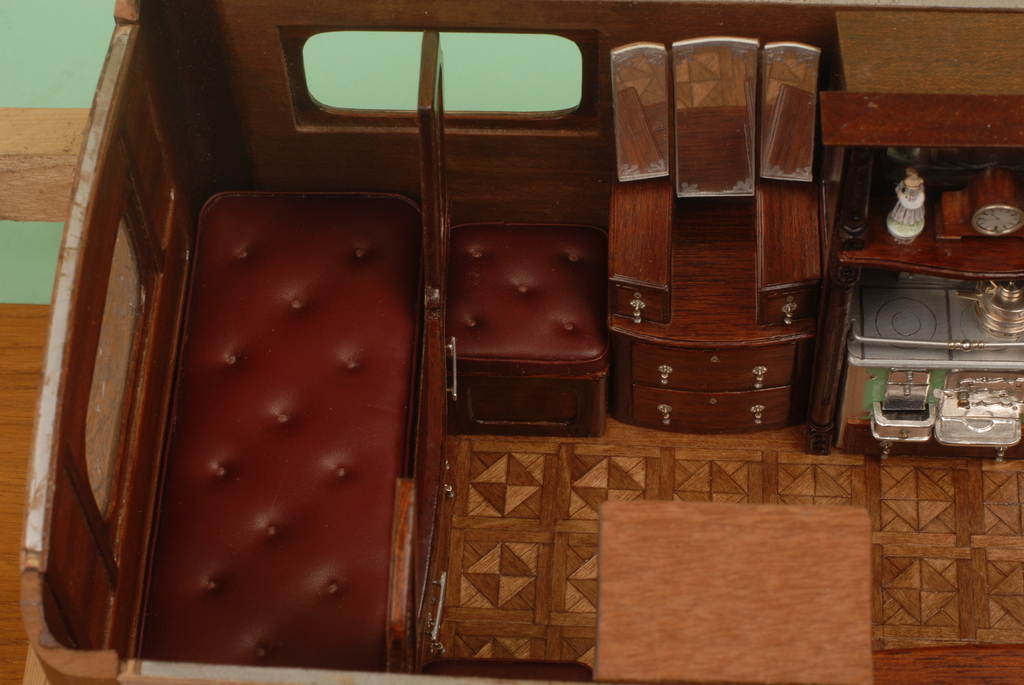 Close up of Eccles model interior showing leather upholstery