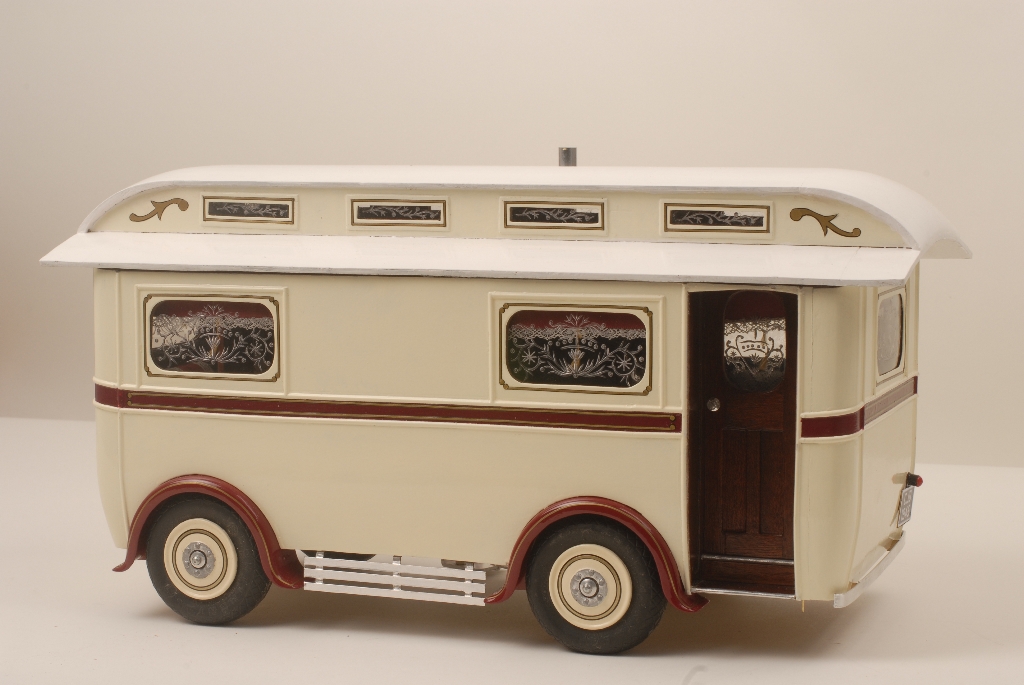
1927 ECCLES "FORTUNE TELLERS WAGON"
 I try to build a completely different model each time in the hope that I will end up with a fair cross section of wagons used by showmen from the late 1800s to the mid 1900s. I first came across this little wagon a few years ago at the Ardingly vintage vehicle rally in Sussex and tried to locate the owner but had no success. I saw it again a year later in the same place but still could not find the owner but I did manage to get his phone number and tried to contact him many times. I gave up on the idea until it appeared on the BBC's Antique Road Show so I decided to write to the BBC and ask them if they would pass my letter to the owner. In spite of supplying a stamped addressed envelope, I never received a reply so I decided to forget it completely. I quite unexpectedly met the owner (Chris Sales) at a Living Van Rally at the Blists Hill Museum in Shropshire about three years ago but he told me that the BBC had never forwarded my letter. He gave me his address and invited me to go and see the wagon (he had a different one at the rally). I saw him and the wagon several times after that but the last time I saw it was at the Great Dorset Steam Fair and it had a 'for sale' sign in the window. It was quite ironical really because it was in my interest for him to keep the wagon until I had finished my model but I found myself acting as an 'Estate Agent'( while he was having a look around Rally Ground) showing possible buyers over the wagon. I received a phone call a few weeks later from someone asking for the owners telephone number. The final outcome was that it was purchased by Gordon Boswell who owns and runs the Romany Museum at Spalding in Linconshire where it is on show with his fine collection of Gypsy Wagons. This now meant that I no longer had easy access to the wagon to take photos or get measurements etc. I was on the point of abandoning the project when I found out that Julian Wolfe, who owned one of the other wagons that I had made a model of, also owned a very similar wagon made by Eccles so I contacted him to make arrangements to go to see it. It turned out to be the same on the outside but with a slightly different layout on the inside. I realised that I could use some of the information that I had already, so I decided to continue.
I am only interested in wagons with a Mollycroft Roof and this feature lost favour just after World War II. Anyone who knows anything about living wagons will be able to describe a Mollycroft Roof but I have never found anyone who knows where or how the term originated. I have heard two plausible explanations without being able to substantiate either. Firstly that it was derived from a French word and secondly that it was named after a lady called Molly Croft. These roofs have a raised centre section which has small opening windows and ventilators along each side which let in extra light and fresh air. Wagons over the years were generally getting bigger and bigger so this one which was built by the Eccles company was a departure from the trend. Other manufacturers like Hills and Brayshaws also saw a gap in the market for a small wagon that could be towed by a large family saloon car instead of the steam traction engines and powerful lorries usually required. As well as four wheeled wagons some manufacturers also made two wheel versions. This appealed to the people who did not have any equipment to cart around and fortune tellers fell into this category. They usually only had a pack of cards, a crystal ball and sometimes a bird in a cage which was trained to pull cards from a pack with predictions on them. The birds would probably be Chaffinches or a similar species. These birds would live in a cage outside of the wagon. True fortune tellers are not really showmen at all, they are Romanies but the large crowds that attended the fairgrounds between the wars made it the ideal venue for them to ply their trade. So you had the situation of Romanies using wagons designed for showmen instead of their usual Gypsy wagons. Although not specifically manufactured for them, these wagons are still widely referred to as fortune tellers wagons. These little wagons had all of the style of the much larger more expensive wagons and the interiors had lots of cut glass mirrors and display cabinets. In order to reduce the height, Ackerman steering was used which is the same as that on a car where the wheels turn individually on stub axles unlike the big wagons where the wheels are both on the same axle and turn together on a turntable. This wagon at one time had been in the possession of Living Wagon decorator and historian, John Pockett which is handy when I need to know anything as John has helped me with all of my previous models.
I thought I would try to keep a written account of the progress or lack of it as I go along this time so here goes. To a casual observer, this little wagon should be simple to make but I had a feeling right from the time that I first saw it that it was going to present me with a lot of serious problems and this has turned out to be the case. I can’t think of anything so far that has gone right first time but it makes it more satisfactory when it finally comes good. Once I have chosen my subject I make a check of all of the bits that look as though they may be difficult and then starting with the most difficult, I try to work out how I am going to make it. I knew from the start that the wheels were going to be a problem as they have pneumatic tyres and I have neither the equipment or the knowledge to make them myself so this means locating some that are going to be suitable. After a fruitless search around the toy shops I tried aero modelling shops and eventually found some the correct size but requiring a fair bit of alteration. With the wheels sorted it was time to concentrate on the set of four mud guards as these are made of very thin steel with curves and flared ends and would not be easy to make from wood because of the thickness. A model aircraft friend of mine told me of a chap he knew who does vacuum moulding for him and suggested I give him a ring to see if he could help me. He said all that he required was a wooden pattern of the correct size which my son in law did from a sketch which I gave him. The finished article was excellent and I would certainly use this method again.
Two other areas that I knew would be troublesome were the floor and the very decorative cut glass mirrors and windows (I think that I counted 29 separate pieces of glass). The floor has a large panel measuring 10ft x 3ft made up of 30 small panels 1foot square. Each of these small panels comprises of 16 segments making a total of 480 individual pieces to make the complete floor. The bulk of the tiny segments are triangular in shape which means that the corners are very prone to breaking off when you are cutting the pieces to make them in 1/12th scale. The floor in the full size wagon should be made of medium coloured Oak but I decided to make mine of 1/32inch Birch ply and stain it. Cutting the small pieces turned out to be more difficult than I had expected although the rectangular bits were not a problem the triangular pieces certainly were. Even using a brand new scalpel blade, most of the corners broke off so I next tried using a small guillotine but this was not man enough for the job. A larger guillotine left dent marks along the edge of the wood that had been cut so it was time out for some thinking. In desperation I tried a dress makers cutting wheel and whilst I had to press fairly hard it made a nice clean cut with corners intact 90% of the time so I was able to start building the floor, or so I hoped. My original thoughts were to cut 30 one inch squares of 1/32nd inch ply and make up individual panels using the squares as backing and then simply glue them all onto a backing board to make the complete panel. After I had completed a few squares, I had a dry run to see if it was going to work out but in spite of all of the care that I had taken in cutting the small segments it started to run over size as I added more squares, so it was back to the drawing board once more.
Finally I decided to accurately mark out the complete panel of 30 one inch squares on a single piece of 1/32nd inch ply and glue the segments straight onto it. This way I could check as I went that the overall size was correct. You can see from the photo that each square is framed by 4 small pieces of rectangular wood, so I did all of them first leaving the centres to be filled with 12 small triangular pieces in each square. It was a bit like a jigsaw puzzle trying to find bits with the grain running in the right direction. If a bit was too small, I would discard it and if it was too big, I would shave a slither off until it fitted. The end result was well worth the effort in my opinion.
On three separate occasions I was on the point of packing the project in and the first was when I found out that the wagon had been sold as was going to Lincolnshire but as I mentioned earlier I eventually found another wagon and decide to continue.
The four main walls of the wagon gave me a problem I had not anticipated. The top 2/3rds of the out side walls are flat and then curve in at the bottom so I decided to make the top section of each wall from a single piece of 1/8th MDF board and make plywood formers to be glued into the bottom of the MDF at about 1 1/2 inch intervals for the curved bottom so the whole thing looked like a big comb with widely spaced teeth. I then veneered the inside of the wall with Mahogany (just the MDF section as the bottom would be concealed by the furniture when it was fitted) and covered the whole of the outside with 1/32 inch ply. This gave me the right shape for the walls without any joins showing. I clamped it up while the glue set and left it over night. When I inspected it the next morning, the whole thing was a complete disaster. The whole side had bowed right along the top edge and nothing that I tried would pull it back into shape. I have had this happen before when I have stuck two different materials either side of a thin sheet. I should have learnt my lesson. I solved this problem by using aluminium instead of MDF board and everything is now dead straight.
The four corner sections are made from solid Mahogany and shaped to match the walls. The inside walls are made up of various shape panels (Mahogany). I drew the shapes of these panels onto a piece of 1/64th inch thick ply and cut away all of the unwanted ply leaving me with the shape of the framework that I required. I then stuck Mahogany veneer onto the ply framework making sure that the grain ran in the right direction as on the full size wagon. It was on the 30th August 2005 that I received the news that my good friend of 35 years had unexpectedly died of a heart attack. He had been with me from the start of my fairground adventure and took most of the reference photos I used as well as helping with all of the measurements I needed. It took me quite a while to get back to modelling as I was used to having company on all of my trips out but had to get used to going on my own. I did eventually get started again after a few months.
I was now at a point where I could start on the built in furniture. I knew from previous experience not to glue the walls and floor together until I was satisfied that all of the interior bits and pieces fitted perfectly.It is not until the last piece of furniture is in place that it is possible to be sure that it all fits. I have numerous dry runs to make sure all is well. I had to make a number of adjustments to various bits of furniture to get it to fit properly remembering to install the wiring for the pair of oil lamps. I made an adjustable jig to hold the four walls and floor in their correct position while I was testing the furniture fitting. The jig was also used as a clamp to hold the walls and floor when they were finally glued.
The patterns on the six main windows were of a far more complicated design than any of the previous ones that I had done and I decide o take my niece Linda with me to do some drawings of all of the glass and the measurements involved as she is better than I am at that sort of thing plus the fact that it gave her a chance to see the actual wagon. From these drawings I make my own patterns in 1/12th scale sticking as close as I can to the originals but making any amendments as I go in the areas that think are beyond my capabilities. I tried to find a way of making the cutting a little easier. I use a very small wood carving V shaped chisel and carve the pattern on the reverse side of a piece of acetate sheet and this gives a very realistic effect. The main problem is that the surface of the acetate is very hard and shiny which makes it extremely difficult to control the chisel which can result in unwanted cuts. You can be sure that if you do make a slip, it always happens when you are right near the very end. I have overcome this problem to some extent by mounting a hair dryer in a position where the heat can be directed onto the acetate which softens it just enough to give a bit more control over where the chisel goes. I only had to discard two windows this time which is better than some of the previous models that I have made.
The seating is made using real leather which I obtained from a tannery in Yeovil in Somerset .I sent them a sample of the colour that I wanted and they matched it perfectly for me. I used a thin piece of fairly soft wood to get the shape of each seat but I undercut it by 3mm all round to allow for the thickness of the leather. Next I stuck a piece of thin foam rubber to the wood using double sided sticky tape and trimmed the foam to the shape of the wood with a very sharp scalpel. For the covering I cut a piece of leather leaving a generous overhang all round so that I had something to get hold of and using very small brass pins with a reasonable head on them secured a long edge first by pinning the leather to the edge of the wood. Pull the leather as tight as you want it and start pinning the other side working outwards from the middle. Leave the corners to last and get rid of as much surplus as possible and fold what is left in which ever way you find easiest to get round the corner pinning as you go (I seldom do it the same way twice). For the edging I cut a strip of leather about an inch (25mm) wide using a straight edge and mark it lengthways down the middle on the reverse side with a blunt pencil, this gives a guide to placing the glue as well as making it easier to get a good straight edge when it comes to folding it. I use PVA glue and apply it with a small piece of wood (a cocktail stick mostly)along one side of the pencil line trying to spread it evenly and then fold it in half using the line as your guide. I press it with my fingers along the length and finish it off by rolling a pencil or a piece of tubing along the folded edge to get a nice sharp even fold. I then fix one end of the edging at the back of the seat with a small brass pin and then work it right round the seat using spots of glue as I go to keep it in place and finish it with a butt join at the starting point held by another pin. Any surplus leather can be trimmed to the level of the wooden base using a sharp scalpel. All that is left is to create the buttoned effect. To do this I use round headed brass pins that are about 1/2inch (12mm) longer than the thickness of the padded seat. Work out the spacing of the buttons and proceed to hammer in the pins through the leather until there is about 1/4inch (6mm) of the pointed end showing. There should be a similar amount of the pin head showing above the other side. Next mix some paint to match the colour of the leather and apply to the pin heads (they should be clear of the leather to avoid getting any paint on it). When the paint is dry the pins can be pulled into place from the underside with a pair of pliers and the pins can then be cut level with the wooden base. This method avoids the risk of damaging the painted heads if you try to hammer them down.
The final setback came when I developed trouble with my left eye which required laser treatment and I was told that it would be about six months before my sight would be back to normal. This was a bit of a problem as it was very difficult to see what I was doing. I did have a bit of good fortune as the eye cleared in about two months and I was able to continue.
The roof is made from aluminium which I got rolled for me at a metal factory for a small donation to their tea club. The outside is covered in thin ply and the inside with Mahogany veneer using an impact adhesive. The curved ends of the raised section are made from solid wood and carved into shape.
I was sitting in the full sized wagon one day wondering how they did the fortune telling as there was no where to place the cards or crystal ball. I rang my friend John Pockett for his advice and he described something known as an occasional gypsy table which they would have used. Another friend found one for sale on the Internet with not only several good photos but details of all of the measurements and colours which I used to make my 1/12th scale version.
The one other area that required a lot of thought was how to make the little drop handles that were used on all of the drawers and cupboards. I eventually solved this by using a leather punch to cut the small discs required for the round backplates from self adhesive aluminium tape. I used a large pin to mark a hole in the centre and eight evenly spaced pin pricks around the edge for decoration and I used large headed pins which I bent at 90 degrees just below the head which I cut to size and inserted in the centre of the disc for the handle.
I rang Gordon Boswell at the Romany museum to seek his advice on what sort of ornaments etc would have been in the wagon as I was not sure if the Romanies would have had different valuables to the travelling showmen. From the information that he gave me, I was able to get various items made by specialists in order to get the authentic look that I was after.
There are a number of people in addition to Gordon Boswell, that I would like to thank for their help in making this project possible:
Julian Wolfe and Chris Sales for allowing me access to their wagons.
John Pockett for his usual good advice.
Joyce Dean for providing some of the ornaments and helping me to source others.
Pinchbeck Miniatures for the small figures on the mantle shelf. I found out during one of our phone calls that they are friends of Gordon Boswells (it’s a small world).
Ruth Dale made the lovely lace mats and cushions from the descriptions I gave her.
All of the silver came from Simply Silver and was made by Victor Pain from photos and measurements which I supplied.
As with my previous models, the lighting was made by Ray Storey Lighting from illustrations in an old catalogue with the measurements I supplied.
Sue Carter once again supplied the tea service as per my request.
I am sure that some of the jobs that I ask these craftsmen to do must be more trouble than they are worth financially but they have never refused to help me which is why I wanted to express my thanks.
Unlike my previous models, I have not had much luck in tracing the history of this wagon. As far as I know it was originally owned by a Welsh showman named Owen Smith but I do not know what he did. It later belonged to John Pockett and currently is in the ownership of Julian Wolfe and that is as much as I know.
I have dedicated this model to my friend Chris who helped me with all of my previous ones but sadly never lived to see this one completed. The number plate on the wagon (CJD 1945) is his initials and the year he was born. Since his departure I no longer have the desire to travel the long distances (on my own ) so I now spend more time doing talks and exhibitions to raise money for a children's hospice. I would like to say that it was by design that the hospice I chose to support was 'Christophers' but it was a pure accident but never the less a very appropriate choice.
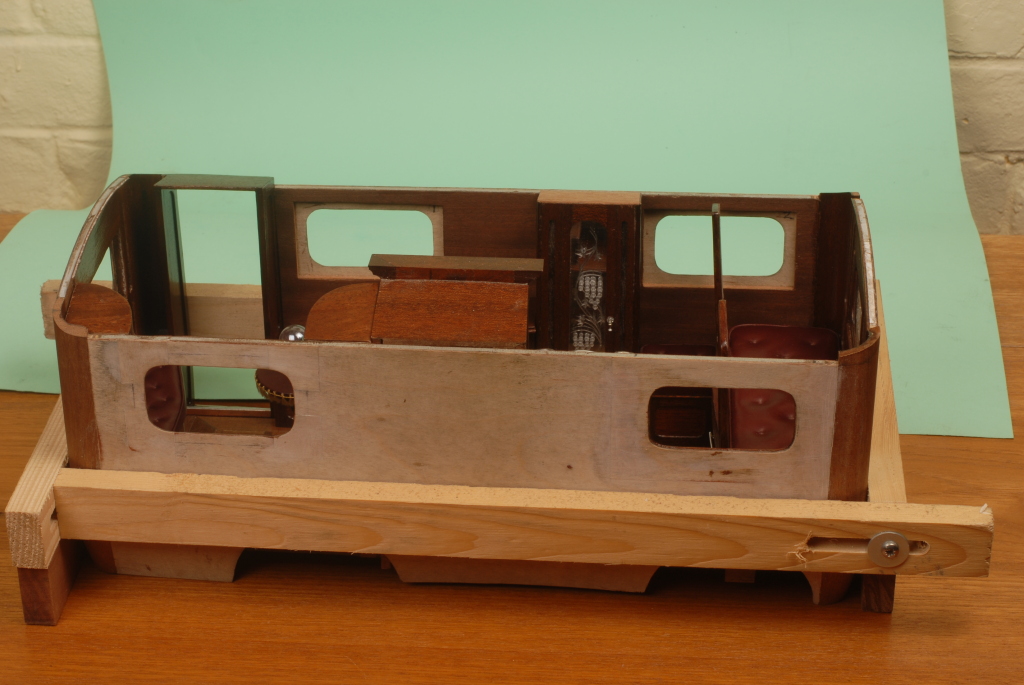 Walls and curved mahogany corners clamped in place.
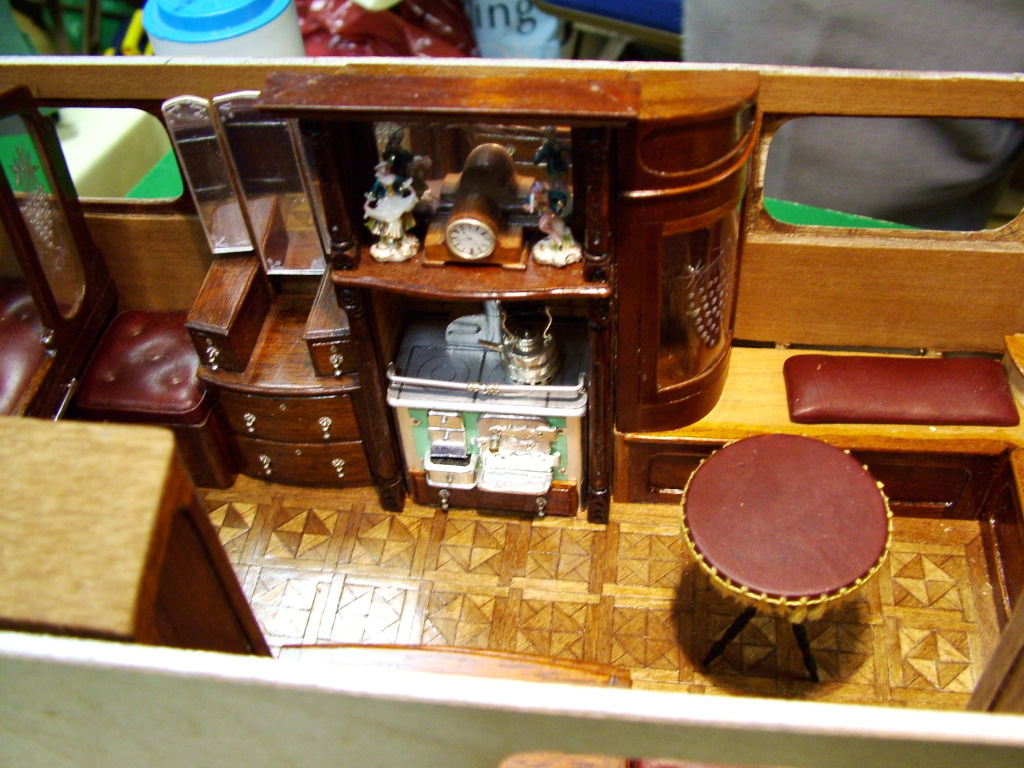 Testing to see that the furniture fits.
 Occasional Gipsy table and crystal ball for the Fortune Teller’s Wagon.
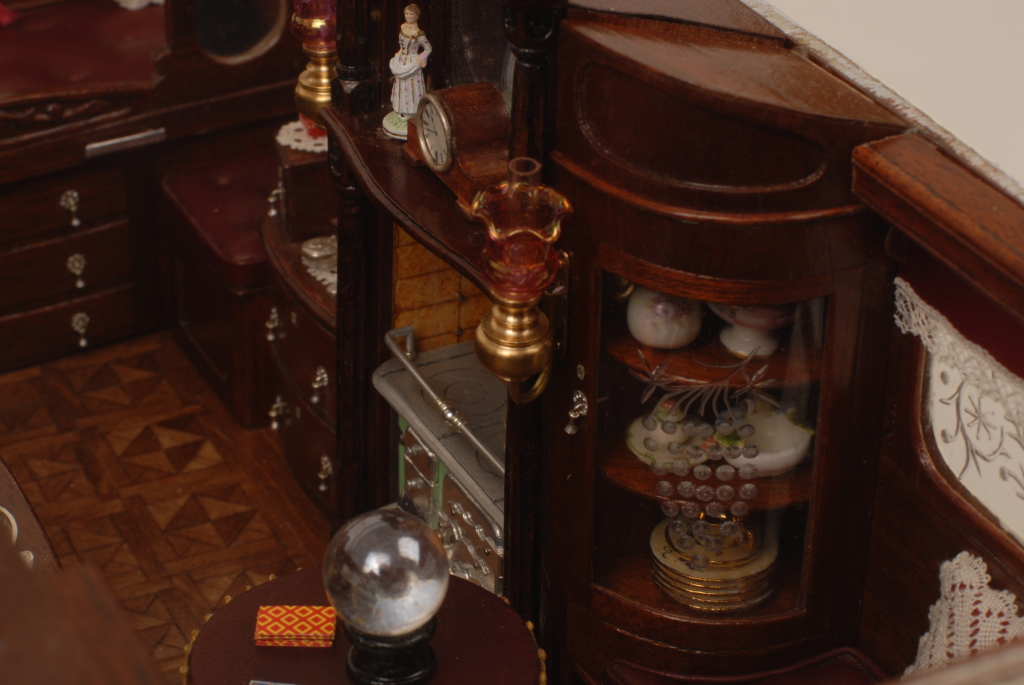
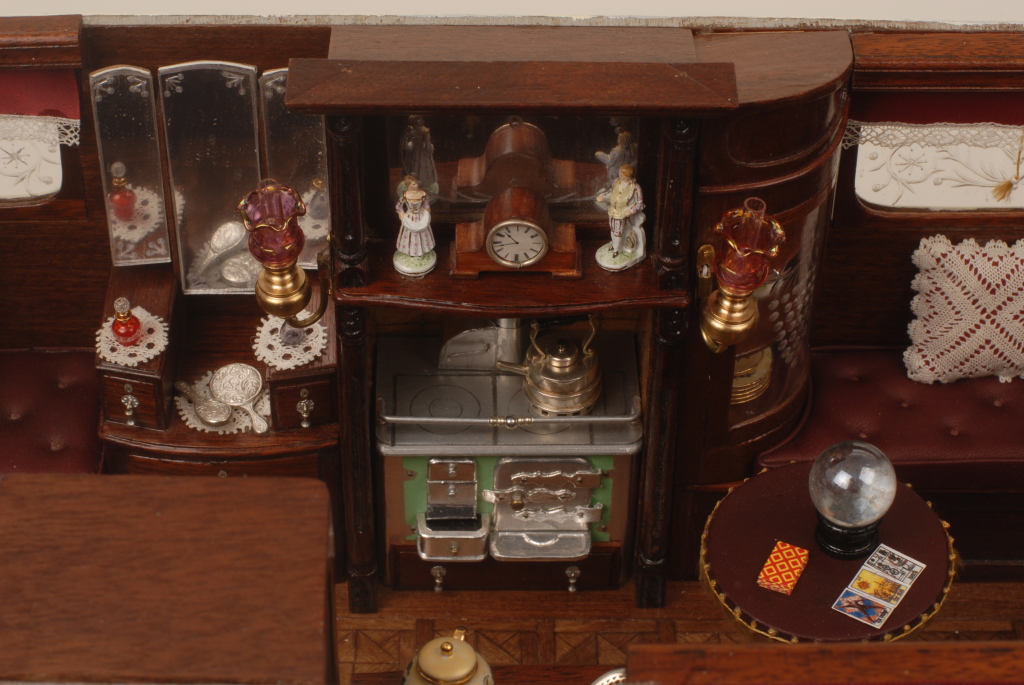 Hostess Stove and Oil Lamps.
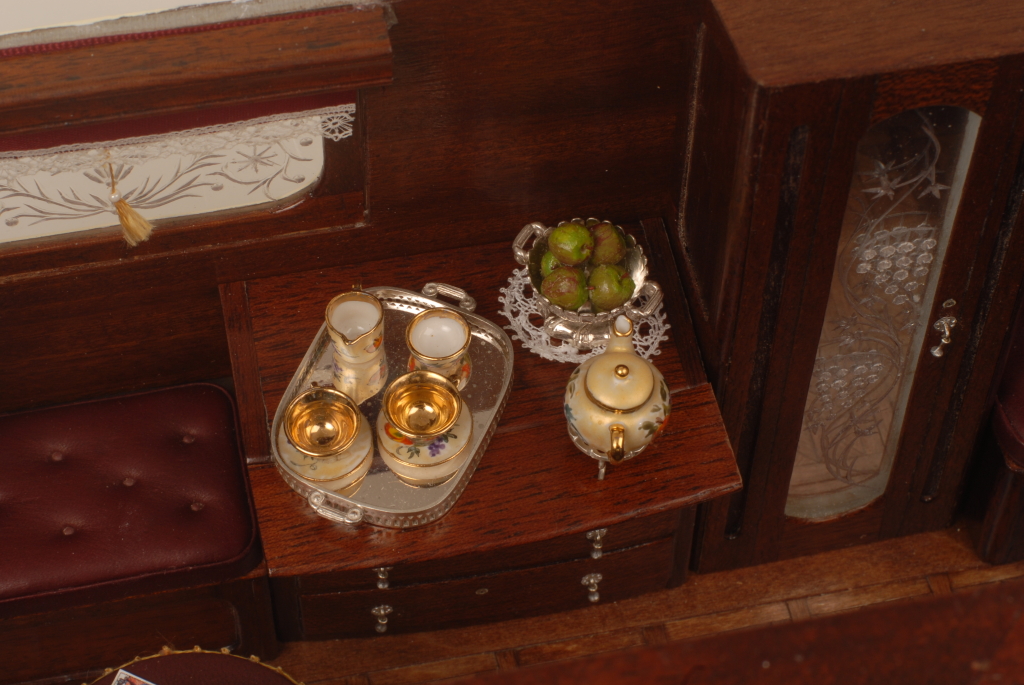 Silver Fruit Bowl and Tray with Hand Painted Bone China.
 Corner Display Cabinet with more Bone China.
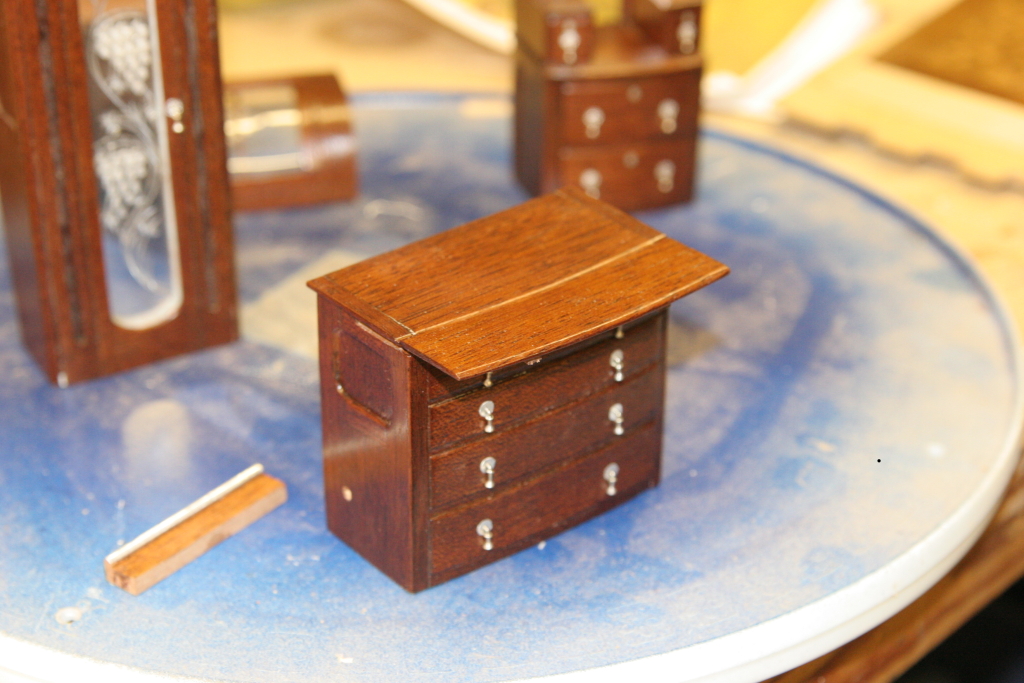 Chest of drawers with flap extended.
 Chest of drawers showing how a spring holds the top in place.
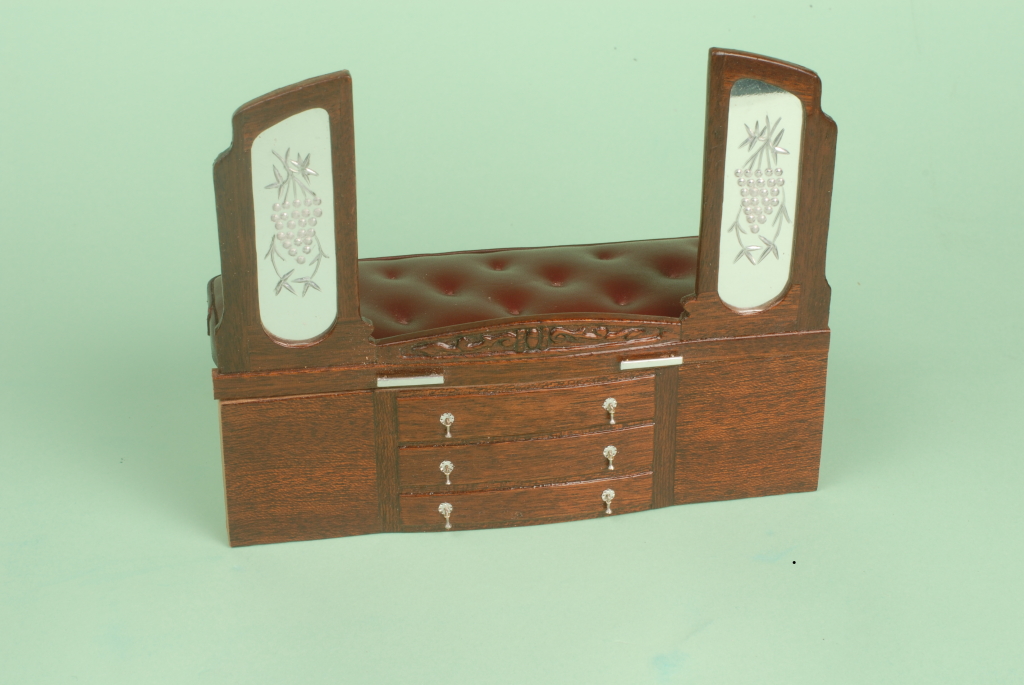 Bed with sliding mirrored panel.
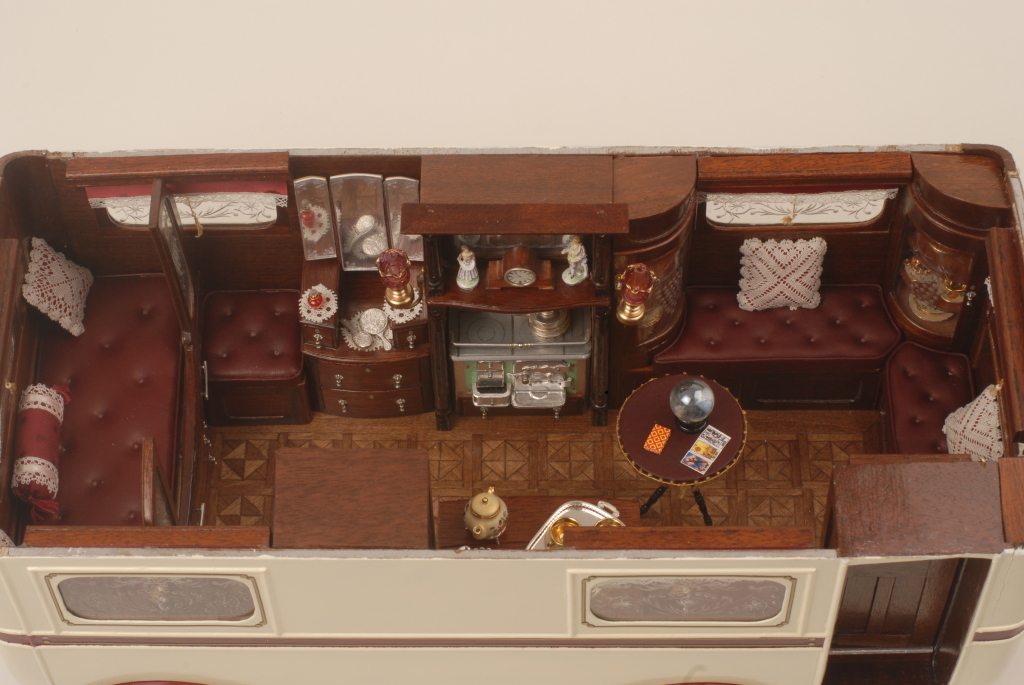 Interior view of the Eccles.